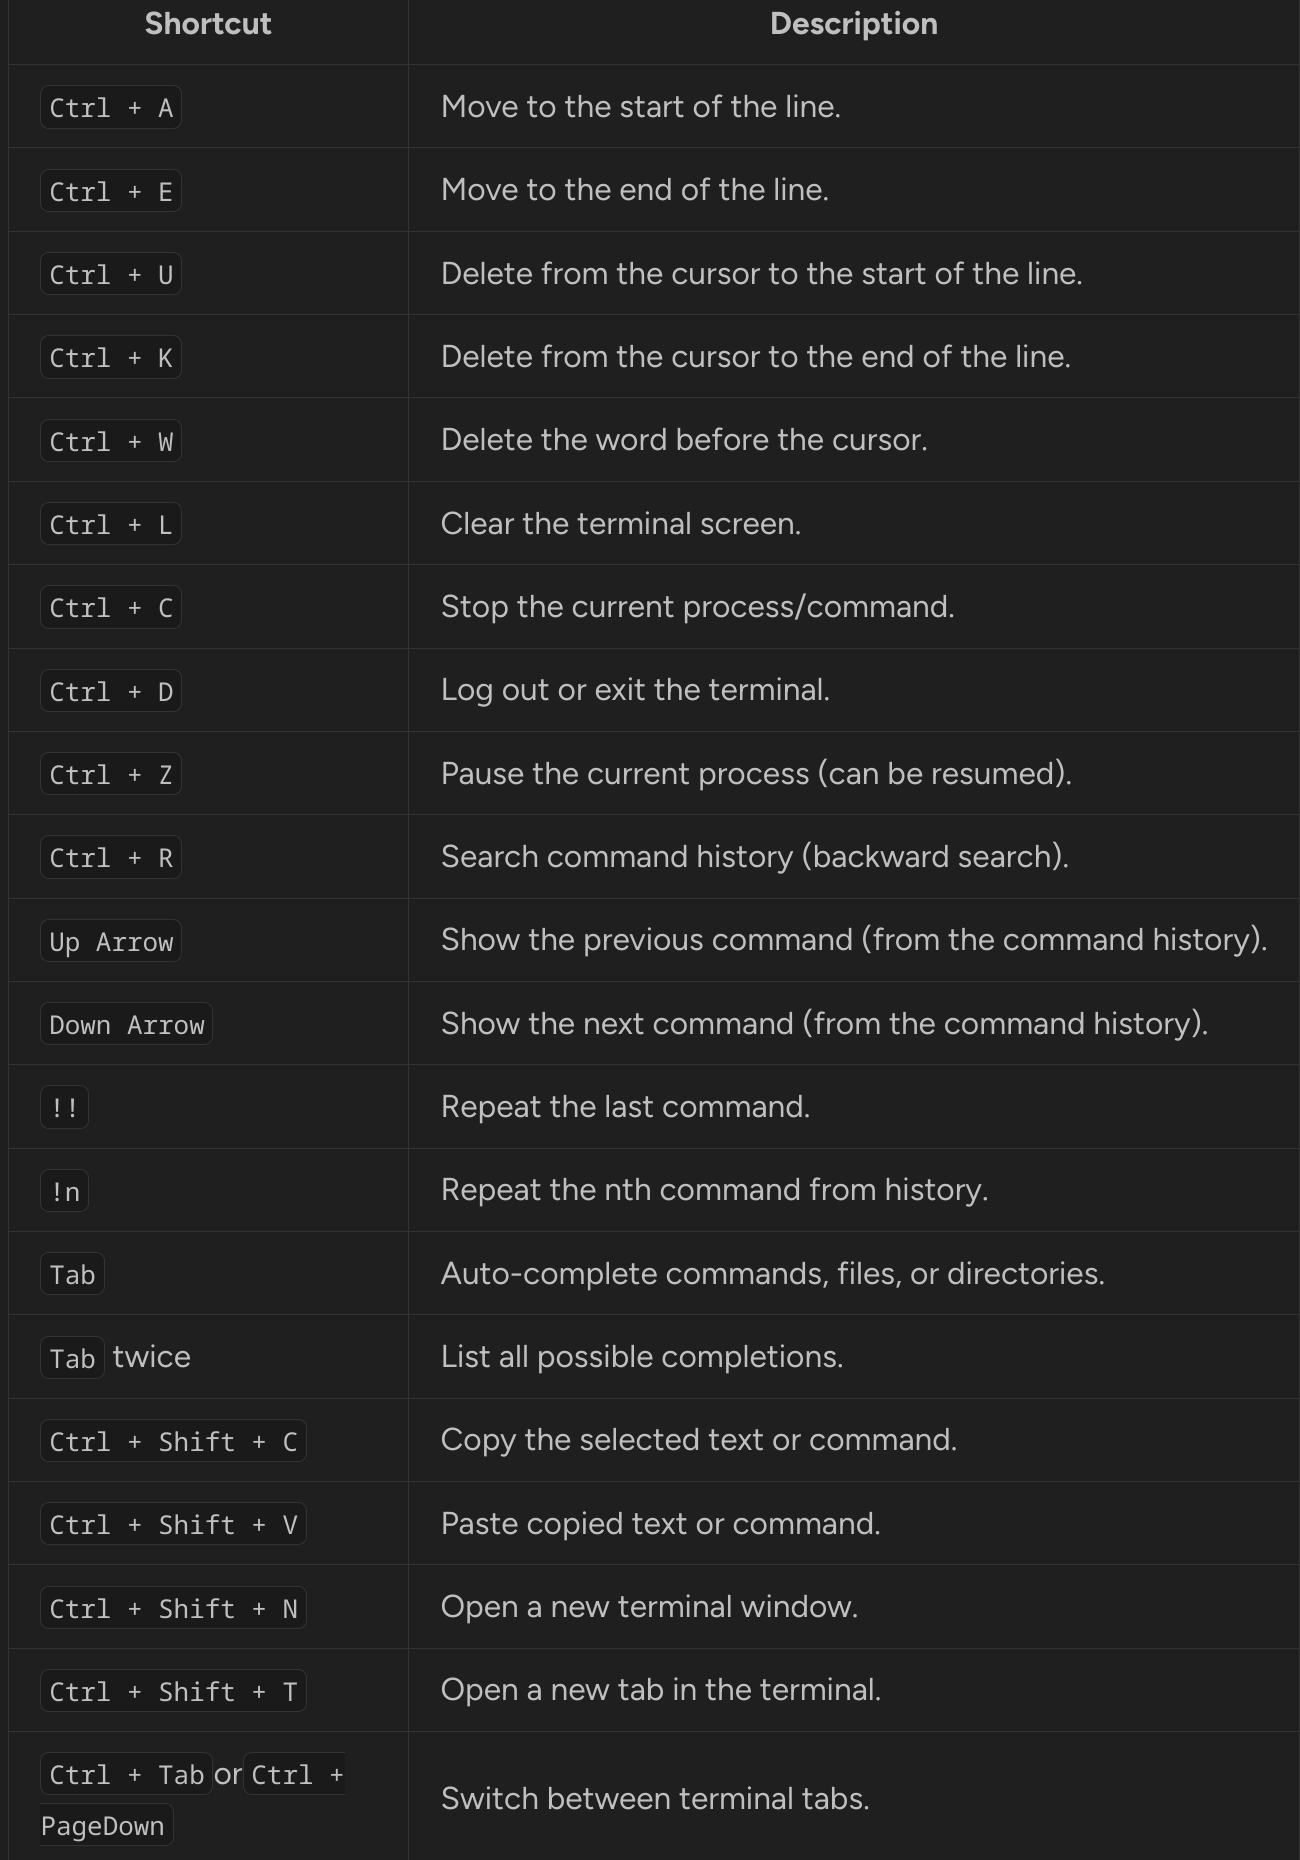
askubuntudan copy paste ettim

The commandline version of the libatasmart library used by Gnome Disks is called skdump part of the libatasmart-bin package which is not installed by default. Install by using:

sudo apt-get install libatasmart-bin

Next run the following command to see the SMART information by running the following command in the terminal (replacing /dev/sda by the path to your drive):

sudo skdump /dev/sda

As an alternative the smartctl from the smartmontools package could be used. Install by using:

sudo apt-get install smartmontools

You will then be able to get information on SMART by running the following command in the terminal (replacing /dev/sda by the path to your drive):

sudo smartctl -a /dev/sda

Note that smartctl tends to be overly verbose. Use the -q errorsonly argument to display only errors:

sudo smartctl -q errorsonly -a /dev/sda

du –max-depth=1 | sort -n # Show the size of all the directories in the current directory and sort them by size.

hatta du -h –max-depth=1 | sort -n

[root@isminiyaz log]

# du -h –max-depth=1 | sort -n
2,0M ./directadmin
4,0K ./iptraf
4,0K ./ntpstats
4,0K ./sssd
7,4G .
8,0K ./samba
21M ./sa
30M ./audit
32K ./ConsoleKit
56K ./cups
80K ./prelink
111M ./httpd
554M ./proftpd
698M ./exim

[root@isminiyaz log]

#

php ile mssql sunucuya baglanalim. Centos 7 uzerinde Directadmin icin yazdim.

1- php 5.6 ile FREETDS kullaniyoruz

freetds yi cek

wget wget ftp://ftp.freetds.org/pub/freetds/stable/freetds-patched.tar.gz

freetds yi uygun sekilde kur:

tar zxvf freetds-patched.tar.gz
cd freetds-1.00.109/
./configure –prefix=/usr/local/freetds
make
make install

php configure dosyasini duzenle

nano /usr/local/directadmin/custombuild/configure/ap2/configure.php56

    --with-mssql=/usr/local/freetds \

ekle 

sonrasi bu:

cd /usr/local/directadmin/custombuild
./build php n

2- Php 7.2 icin – Php 7 ile beraber freetds kullanamiyoruz. php destegini kesti.

microsoft kendisi cikardi pdo lib sqlsrv vs vs

php 7.2 icin kurulum su sekildedir. (PECL ile yapicaz)

curl https://packages.microsoft.com/config/rhel/7/prod.repo > /etc/yum.repos.d/mssql-release.repo
yum update
ACCEPT_EULA=Y yum install -y msodbcsql mssql-tools unixODBC-devel
pecl install sqlsrv
pecl install pdo_sqlsrv
nano /usr/local/lib/php.ini

ekle:

extension=sqlsrv
extension=pdo_sqlsrv

kaydet.

service httpd restart

Gule Gule Kullan…

this is youtube re-embed test


no start stop script needed 😀

##Debian / Ubuntu
##INSTALL

sudo apt-get update && sudo apt-get install gcc make -y

wget https://github.com/z3APA3A/3proxy/archive/0.8.12.tar.gz

tar zxvf 0.8.12.tar.gz

cd 3proxy-0.8.12

make -f Makefile.Linux

sudo cp src/3proxy /usr/local/bin/

##CONFIG
##NO LOGS - NO SOCKS - NO IP SELECTION
##IPv6 + IPv4 ENABLED

nano 3proxy.config

-------------------------------------------
nserver 1.1.1.1

nserver 9.9.9.9

nscache 65536

timeouts 1 5 30 60 180 1800 15 60

users username1:CL:password1

daemon

log /dev/null

authcache user 60

auth strong cache

allow * * * *

proxy -64 -n -a -p8182
-------------------------------------------

##START

3proxy 3proxy.config


DONE!

Instalation of IBM DB2 module should be very easy (refering to the installation instructions):

  1. First of all, we need to download the driver package from here
  2. unpack the package to the server at /opt/ibm_db2/dsdriver
  3. chmod 755 installDSDriver
  4. ./installDSDriver
  5. Install pecl and php-pear (may need ksh): yum install php-pear
  6. pecl install ibm_db2
  7. When asked, provide the path to the db2 driver (here /opt/ibm_db2/dsdriver)
  8. You may check if it is installed by: pecl list
  9. Last thing: chmod o+w /opt/ibm_db2/dsdriver/cfg
  10. Edit /etc/php.ini and add extension=ibm_db2.so
  11. service httpd restart

Then in PHP:

<?php
    $databaseName = "your_db_name";
    $hostName = "your_host_name";
    $port = 50001;
    $userName = "your_user_name";
    $password = "your_password";
    $conn_string = "DRIVER={IBM DB2 ODBC DRIVER};DATABASE=$databaseName;HOSTNAME=$hostName;PORT=$port;PROTOCOL=TCPIP;UID=$userName;PWD=$password;Security=ssl;";
    $conn = db2_connect($conn_string, '', '');

    if($conn) {
        echo "Connected!";
        db2_close($conn);
    } else {
        echo "Not connected<br>";
        echo db2_conn_errormsg();
    }
?>

Whole process with lot of pre-requisites for python is here (it works with little modifications for PHP too).

Hello,

you can fix that problem with an arping:

[root@hedodhedo ~] # arping -s 37.247.112.71 37.247.112.1
ARPING 37.247.112.1 from 37.247.112.71 eth0
Unicast reply from 37.247.112.1 [00:0B:45:80:C0:00] 1.846ms
Unicast reply from 37.247.112.1 [00:0B:45:80:C0:00] 1.483ms
^CSent 2 probes (1 broadcast(s))
Received 2 response(s)
[root@hedodhedo ~]# logout
Connection to 37.247.112.70 closed.

# ping 37.247.112.71
PING 37.247.112.71 (37.247.112.71) 56(84) bytes of data.
64 bytes from 37.247.112.71: icmp_seq=1 ttl=63 time=0.377 ms
64 bytes from 37.247.112.71: icmp_seq=2 ttl=63 time=0.205 ms

— 37.247.112.71 ping statistics —
2 packets transmitted, 2 received, 0% packet loss, time 1000ms
rtt min/avg/max/mdev = 0.205/0.291/0.377/0.086 ms

Kind Regards,

I have a WordPress website on my server. But when I upload its database to live server, I get error

#1273 – Unknown collation: ‘utf8mb4_unicode_520_ci’

Solution:

sed -i 's/utf8mb4_unicode_520_ci/utf8mb4_unicode_ci/g' file.sql

Copy/Paste Information

mysql -u username -ppassword databasename < databasename.sql